Braids - Intro to git
Goal: introduce Git as an archiving practice, then do a little branch-based website exercise published live.
Planning (90 min)
- Context: what git is, what it does, who uses it (5 min)
- Core concepts (20 min)
- Recap (5 min)
- Install Git (10 min)
- Core commands (15 min)
- Exercise: accounts + clone/push permissions (10 min)
- Exercise: branch a page, publish live, iterate (20 min)
- Wrap-up: good practices + next steps (5 min)
Workshop outcome
Each participant will:
- have basic knowledge of git
- clone a repository
- create a branch
- commit changes
- push branch to our platform
Why git?
If you have been working on a file on your computer and the directory starts to look like this:
motivation-letter-first-draft.odt
motivation-letter.odt
motivation-letter-less-formal.odt
motivation-letter-less-formal-comments-HvK.odt
motivation-letter-less-formal-comments-HvK-LS.odt
motivation-letter-FINAL.odt
motivation-letter-FINAL-pictures.odt
motivation-letter-FINAL-pictures-small.odt
Then git can be helpful!
this file has different chronological versions, features and collaborators, 3 things git is great at.
What is git?
- git is a distributed version control system
- git tracks changes over time to files inside a folder
- git operates in a hidden sub-folder inside the tracked folder
- git enables:
- history (time)
- collaboration (many authors)
- experimentation (branches)
- traceability (who/what/when/why)
is the archive analogy helpful? it feels a bit like comapring something abstract with something else thats abstract
Archiving analogy: - commit = deposit with metadata - log = inventory / finding aid - branch = parallel dossier / alternative interpretation
What is git not?
- git ≠ Github!
- git ≠ backup system (though it can help)
- git ≠ file sync tool (though it can be used like that)
- git ≠ CMS (though it can be used like that)
- git ≠ magic: it stores snapshots + metadata, you still choose what to record
Ecosystem
- git: the version control system itself
- git hosts: platforms where git repositories are hosted
- GitHub, Bitbucket, GitLab (operated by Big Tech Giants)
- Alternatives
- Codeberg (non-profit, community led)
- Oxacab (riseup.net for activists, journalists)
- Forgejo / Gitea (self-hosted)
- git clients: tools used to work with git on your computer
- git command line tool (free & open source)
- tig command line tool (free & open source)
- sourcetree, Github Desktop, VS Code (operated by Big Tech)
- many code editors (e.g. sublime, atom) have git extensions
- many, many more tools and extensions
Core concept: Commits
In git, a commit is a checkpoint in the repository timeline. A commit contains this information:
- What changes have taken place?
- Who made these changes?
- When were the changes made?
- Why were the changes made?
- Where was the last checkpoint?
Every time an author makes a set of changes that are meaningful together, she commits her changes by describing them, creating a checkpoint in the timeline to return to in the future.
The changes possible in a commit are: - editing a file - adding a file - removing a file - renaming (moving) a file
Commits do not know about the timeline they are in. They only know of their preceeding commit, otherwise known as their parent.
You can always checkout a commit: visit the repository at that checkpoint on its timeline. Basically time-travel.

Core concept: Working Areas
- Working tree: your files right now
- Staging area: selection for the next commit
- Repository history: overview of commits


This is why Git feels "archival": - you intentionally select what becomes part of the record.
Typical solo local workflow
- You initalise a directory on your computer with git.
- You make changes on the directory.
- You stage your changes and commit them.
- Repeat steps 2 and 3.
Use case: tracking changes on a local, private folder, such as bookkeeping.
Typical solo remote workflow
- You clone a repository from a remote host to your local computer.
- You make your changes to the repository.
- You stage and commit your changes.
- You push (upload) your commit up to the remote.
- Repeat steps 2, 3 and 4
Use case: tracking and backing up a private folder, such as a password store.
Typical collaborative remote workflow
- You clone a repository from a remote host to your local computer.
- You make your changes to the repository.
- You stage and commit your changes.
- You push (upload) your commit up to the remote.
- You pull (download) other people's commits from the remote.
- Repeat steps 5, 2, 3 and 4
Use case: tracking and collaborating on a repository with others such as a website project.
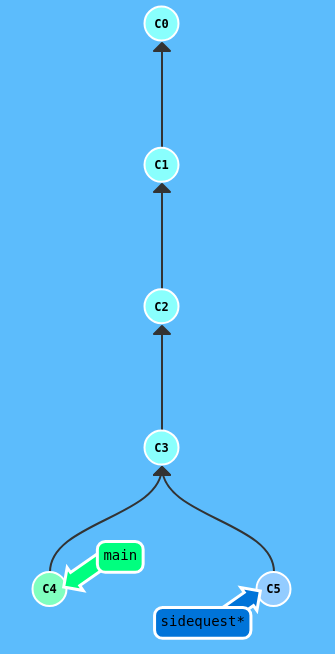
Core concept: Branching
In git, a branch is a named series of commits.
In the previous example, there is only one branch, named "main" by default.
When you want to "take a detour" from the main course of a repository, you can create a separate branch.
Now, parrallel timelines of the same repository exist next to each other.
Example use cases of branching:
- Experiment with a new feature affecting many files
- Proposing an improvement to your collaborators
- Have multiple versions of a website online
- Making existing software compatible somewhere else
There is a lot of discourse around when to branch and how often. It varies from person to person and group to group.
From the perspective of git, since branching doesn't add any technical overload on a project, it is encouraged to branch more and branch often. From a logical perspective, every branch creates a parrallel timeline, and this might be a lot to keep track of mentally.
Branching allows for and encourages collaboration and is at the core of the free and open source software movement.
Core concept: Merging
In git, merging is when you consolidate commits from a separate branch into your own.
There are various merging techniques, and most of the time, the automated algorithm will work.
Sometimes, you might encounter a merge confilct: a section of a file where both branches have conflicting changes that cannot be automatically resolved. Here, you have to manually resolve the conflicts.
which can take the form of: - accepting a change from one branch and rejecting the other - accepting and keeping both changes - re-editing the files to incorporate both changes
After merging two branches, a merge commit is created. This is an exceptional commit that has two parent commits instead of one.

Complex collaborative remote workflow
- You clone a repository from a remote host to your local computer.
- You create a new branch "my-feature" for your changes.
- You make your changes to the repository.
- You stage and commit your changes.
- You push your commit (and new branch) up to the remote.
- You pull other people's commits on this branch from the remote.
- Repeat steps 6, 3, 4 and 5
- You switch back to "main" and merge "my-feature" into it.
- You push your new merge commit up to the "main" branch.
Use case: you are designing a website for a client and want to show 3 different versions of it with different background colours.
Use case: tracking and collaborating on a repository with others such as a website project, where two online versions of the website exist, a "safe" one that is available to the public, and an "experimental" one that is reserved for trying new features together.
Recap
- repository: a directory initialised with git
- commit: a checkpoint in the repository timeline(s)
- checkout: to visit the repository at a specific commit in its history.
- working tree: your files as they are right now in the repository
- staging area: a place to add changes to
- remote: a copy of the repository on a different host
- clone: to download an identical copy of a repository
- push: to upload local commits to a remote repository
- pull: to re-download commits from the remote repository
- branch: a named series of commits, a detour, a parallel timeline
- merge: a consolidation of commits from another branch
Install Git
Check first:
git --versionIf missing:
- macOS: Xcode Command Line Tools
- Windows: Git for Windows
- Linux: package manager (apt/dnf/pacman)
Minimum requirement: you can run git in a terminal.
Commands: the essentials
- git init (initalise a repo)
- git status (what's happening?)
- git add (add changes to the commit)
- git rm (remove a tracked file)
- git commit (store changes in the repo)
- git log (see the timeline)
- git checkout (visit the timeline at a specific checkpoint)
- git clone (an existing repo)
- git push (your commits to a remote server)
- git pull (sync with a repo online and merge)
- git branch (take a detour)
- git merge (merge branches)
Command: git init
Create a repository in the current folder. Use this when you are creating and working on your own projects.
git initCreates a .git/ directory containing history + metadata.
For the exercise we will use git clone instead of git init.
Command: git status (your dashboard)
git statusShows:
- current branch
- staged vs unstaged changes
- untracked files
Command: git add (select files)
First, create a file
nano index.htmlStage files for the next commit.
git add index.html
Stage everything (use carefully):
git add .
Staging is curatorial: select what belongs together.
Optional: git rm
Remove a tracked file and stage the removal:
git rm old.html
git commit -m "Remove old page"
For this workshop you probably will not need it.
Command: git commit (checkpoint)
git commit -m "Added name to my page"
Good commit message pattern:
- What changed
- Why it changed (reason/intent)
- Scope stays small
repeat edit > stage > commit a couple times?
Command: git log (timeline)
git log --oneline --graph
Gives a quick "finding aid" of earlier commits. Press 'q' to exit.
Command: git checkout (timetravel)
git checkout your_commit_id
See your working tree as it would have been at a specific commit on the timeline.
Command: git clone
Cloen (copy) a repository in the current folder. First, cd to a logical location in your computer, then:
git clone https://git.hackersanddesigners.nl/hrk/braids
cd braids
Downloads a repo from the web, complete with the full commit history and all changes.
Make edits here as you wish then stage and commit them.
Command: git push
Push your commits to the server:
git push -u origin main
git pushdisabled push rights for now, only for demonstration purposes, will fail
Command: git pull
before we do this, one of us changes the background colour and pushes
Pull updates from server:
git pullDuring the exercise you mostly push your branch. Pull is mainly for getting new changes on main (if needed).
fact: git pull is actually a git fetch && git merge
Command: git branch
Choose a slug: lowercase, no spaces. This can be your name or an alias. Example: change people/<your-slug> in the command below to people/alex. From here on out replace <your-slug> with your chosen name.
List branches:
git branchCreate a branch:
git branch people/<your-slug>
Switch to branch:
git checkout people/<your-slug>
Shortcut (create + switch):
git checkout -b people/<your-slug>
Branches are parallel dossiers: safe space for changes.
Command: git merge
?
Forgejo: what we use today
- Forgejo is an open-source alternative to Github
- Forgejo hosts the central repository (remote)
You will:
- create an account
- clone via HTTPS
- push your branch
Share your username with us so we can add you as a collaborator
Rules for today:
- do NOT push to main
- create your branch under people/<your-slug>
Forgejo: account setup
- Create account at: git.hackersanddesigners.nl
- Confirm you can sign in
Resources:
- https://git.hackersanddesigners.nl/hrk/braids - the repo we will be working in
- live gallery URL: https://braids.hackersanddesigners.nl
- these slides: https://braids.hackersanddesigners.nl/slides
Exercise overview
You will build a (deliberately) simple page:
- "Hi, I'm …"
- maybe a gif?
- a link?
- optional: background, glitter, bad taste encouraged
Workflow loop:
clone -> branch -> edit -> status -> add -> commit -> push -> view -> iterate
Exercise: step 1 (clone & branch)
If everything went well in your initial clone & branch, check the repo with:
git status
git branch
The first time you checkout from https://git.hackersanddesigners.nl the server will ask you for credentials. These will be remembered, so only once.
Exercise: step 2 (edit the page)
Edit the root index.html (and optionally style.css, assets/).
Make a visible change first:
- Change the name to your name (or your alias)
Then check changes:
git diff
git status
Exercise: step 3 (stage + commit)
git add index.html
git commit -m "Customize profile page for <your-slug>"
If you added assets:
git add assets/
git commit -m "Add assets for <your-slug>"
Small commits win. One change = one deposit.
Exercise: step 4 (push your branch)
git push -u origin people/<your-slug>
(Again, change <your-slug>!)
If prompted for credentials, use your Forgejo login method.
Exercise: step 5 (view live)
Open the gallery:
- https://braids.hackersanddesigners.nl/
Find your card:
- people/<your-slug>/
Iterate:
edit -> status -> add -> commit -> push -> refresh
Common problems (fast fixes)
Wrong branch:
git branch
git checkout people/<your-slug>
Nothing staged:
git status
git add index.html
Push rejected (main protected):
- You are on main. Switch to your branch.
Auth issues:
- HTTPS: check username/password
Suggested “good enough” commit messages
Bad:
- "update"
- "stuff"
- "changes"
Better:
- "Add animated gif and profile link"
- "Change background and typography"
- "Fix broken image path"
Rule: message should still make sense in 6 months.
Optional extension (if time remains)
- Compare two branches visually (gallery view)
- Show git log to narrate your work as a documented process
- Merge other branches into your own
Wrap-up
Learn more:
End: remind participants their branches will be removed after the workshop.